

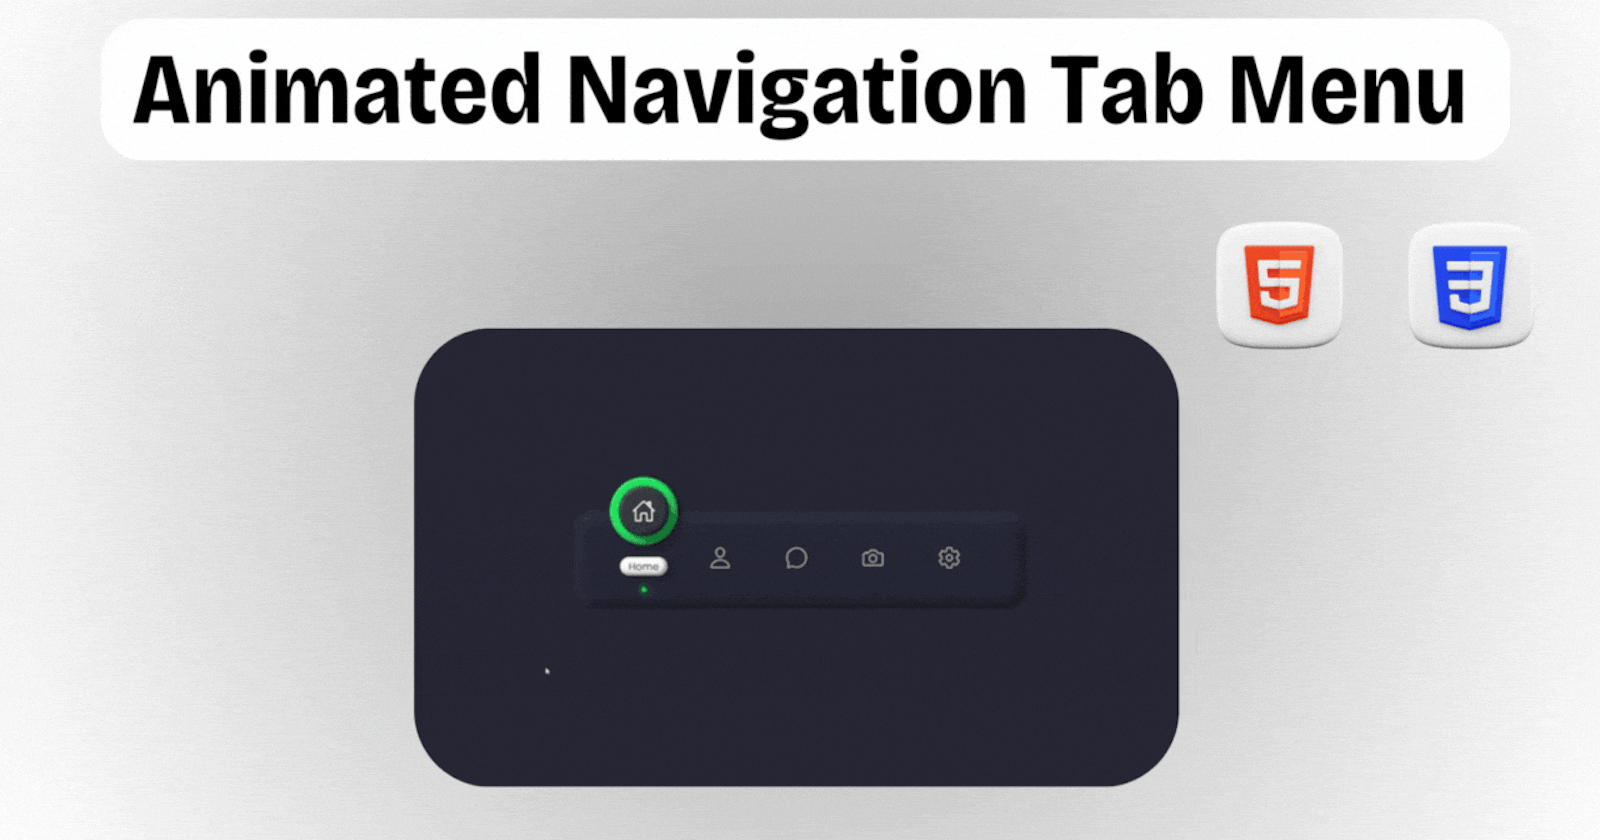


Are you looking to spice up your website's navigation with some eye-catching animations? In this blog post, we'll walk through the process of creating an animated navigation tab menu using HTML, CSS, and JavaScript. This project is part of Day 6 of the #100DaysOfCode Challenge, aimed at enhancing your coding skills through daily practice.
Step 1: Set Up Your Project
First, download the full source code from here to get started. Once you have the files, create a new HTML file in your text editor and name it index.html.
Step 2: HTML Structure
In your index.html file, set up the basic structure for your project. Define a <ul> list to hold the navigation tabs. Each tab will be represented by an <li> element containing an <a> tag.
<!DOCTYPE html>
<html lang="en">

<head>
  <!-- Define document metadata -->
  <meta charset="UTF-8">
  <meta name="viewport" content="width=device-width, initial-scale=1.0">
  <!-- Link to external stylesheet -->
  <link rel="stylesheet" href="style.css">
  <!-- Set document title -->
  <title>Animated Navigation Tab Menu</title>
</head>

<body>
  <!-- Navigation menu -->
  <ul class="navigation">
    <!-- Home tab -->
    <li class="active">
      <a href="#">
        <!-- Icon for home -->
        <span class="icon">
          <ion-icon name="home-outline"></ion-icon>
        </span>
        <!-- Text for home -->
        <span class="text">Home</span>
      </a>
    </li>
    <!-- Profile tab -->
    <li>
      <a href="#">
        <!-- Icon for profile -->
        <span class="icon">
          <ion-icon name="person-outline"></ion-icon>
        </span>
        <!-- Text for profile -->
        <span class="text">Profile</span>
      </a>
    </li>
    <!-- Messages tab -->
    <li>
      <a href="#">
        <!-- Icon for messages -->
        <span class="icon">
          <ion-icon name="chatbubble-outline"></ion-icon>
        </span>
        <!-- Text for messages -->
        <span class="text">Messages</span>
      </a>
    </li>
    <!-- Photos tab -->
    <li>
      <a href="#">
        <!-- Icon for photos -->
        <span class="icon">
          <ion-icon name="camera-outline"></ion-icon>
        </span>
        <!-- Text for photos -->
        <span class="text">Photos</span>
      </a>
    </li>
    <!-- Settings tab -->
    <li>
      <a href="#">
        <!-- Icon for settings -->
        <span class="icon">
          <ion-icon name="settings-outline"></ion-icon>
        </span>
        <!-- Text for settings -->
        <span class="text">Settings</span>
      </a>
    </li>
  </ul>

  <!-- Include Ionicons library -->
  <script src='https://unpkg.com/ionicons@5.5.2/dist/ionicons/ionicons.js'></script>
  <!-- Include custom JavaScript file -->
  <script src="./script.js"></script>
</body>

</html>
Step 3: CSS Styling
Now, let's add some styles to make our navigation menu visually appealing. Open the style.css file and add CSS rules to customize the appearance of the navigation menu, list items, icons, and text.
/* Import Google Fonts - Poppins */
@import url("https://fonts.googlesapis.com/css?family=Poppins:200,300,400,500,600,700,800,900&display=swap");

/* CSS Styles */
/* Reset default margin, padding, and box-sizing */
* {
  margin: 0;
  padding: 0;
  box-sizing: border-box;
  font-family: "Poppins", sans-serif;
}

/* Body styling */
body {
  display: flex;
  justify-content: center;
  align-items: center;
  min-height: 100vh;
  background: #262433;
}

/* Navigation styling */
.navigation {
  position: relative;
  width: 540px;
  height: 120px;
  background: #242433;
  box-shadow: inset 5px 5px 10px rgba(0, 0, 0, 0.5),
    inset 5px 5px 20px rgba(255, 255, 255, 0.2),
    inset -5px -5px 15px rgba(0, 0, 0, 0.75);
  border-radius: 25px;
  display: flex;
  justify-content: center;
  align-items: center;
}

/* List item styling */
.navigation li {
  position: relative;
  list-style: none;
  width: 80px;
  margin: 0 5px;
}

/* List item dot styling */
.navigation li::before {
  content: "";
  position: absolute;
  top: 35px;
  left: 50%;
  transform: translateX(-50%);
  width: 5px;
  height: 5px;
  background: #222;
  border-radius: 50%;
  transition: 0.5s;
}

/* Active list item dot styling */
.navigation li.active::before {
  background: #0f0;
  box-shadow: 0 0 5px #0f0, 0 0 10px #0f0, 0 0 20px #0f0, 0 0 30px #0f0,
    0 0 40px #0f0, 0 0 50px #0f0;
}

/* Anchor tag styling */
.navigation li a {
  display: flex;
  align-items: center;
  justify-content: center;
  flex-direction: column;
  text-decoration: none;
}

/* Icon styling */
.navigation li a .icon {
  position: absolute;
  font-size: 1.75em;
  width: 80px;
  height: 80px;
  display: flex;
  align-items: center;
  justify-content: center;
  color: #aaa;
  border-radius: 50px;
  transition: 0.5s;
  transition-delay: 0.2s;
}

/* Active icon styling */
.navigation li.active a .icon {
  background: #29fd53;
  color: #fff;
  transform: translateY(-55px);
  box-shadow: 5px 5px 7px rgba(0, 0, 0, 0.25),
    inset 2px 2px 3px rgba(255, 255, 255, 0.25),
    inset -3px -3px 5px rgba(0, 0, 0, 0.5);
  transition-delay: 0s;
}

/* Icon inner circle styling */
.navigation li a .icon::before {
  content: "";
  position: absolute;
  inset: 10px;
  background: #2f363e;
  border-radius: 50%;
  box-shadow: 5px 5px 5px rgba(0, 0, 0, 0.5),
    inset 2px 2px 3px rgba(255, 255, 255, 0.25),
    inset -3px -3px 5px rgba(0, 0, 0, 0.5);
  transform: scale(0);
  transition: 0.5s;
}

/* Active icon inner circle styling */
.navigation li.active a .icon::before {
  transform: scale(1);
}

/* Text styling */
.navigation li a .text {
  position: absolute;
  font-size: 0.75em;
  color: #2f363e;
  opacity: 0;
  transform: translateY(20px);
  padding: 2px 10px;
  background: #fff;
  border-radius: 15px;
  box-shadow: 5px 5px 7px rgba(0, 0, 0, 0.25),
    inset -3px -3px 5px rgba(0, 0, 0, 0.5);
  transition: 0.5s;
  transition-delay: 0s;
}

/* Active text styling */
.navigation li.active a .text {
  opacity: 1;
  transform: translateY(10px);
  transition-delay: 0.2s;
}
Step 4: JavaScript Functionality
To implement the animated behavior of our navigation menu, we'll use JavaScript. Open the script.js file and write code to handle the click events on the navigation tabs.
// Select all list items within the navigation menu
let list = document.querySelectorAll(".navigation li");

// Function to activate clicked link
function activeLink() {
  // Remove 'active' class from all list items
  list.forEach((item) => item.classList.remove("active"));
  // Add 'active' class to the clicked list item
  this.classList.add("active");
}

// Add click event listener to each list item to activate link
list.forEach((item) => item.addEventListener("click", activeLink));
Step 5: Testing and Refinement
Once you've completed the implementation, open your index.html file in a web browser to test the navigation menu. Click on the tabs to ensure that the animations work as expected. Make any necessary adjustments to the code to refine the user experience.
Step 6: Conclusion
Congratulations! You've successfully built an animated navigation tab menu for your website. Feel free to customize the design further or integrate it into your existing projects. If you encounter any issues or have questions, don't hesitate to reach out for assistance.
Get in Touch
If you have any inquiries or would like to learn more about this project, feel free to contact me via Bento.
Final Thoughts
Building projects like this one is a great way to enhance your coding skills and add impressive features to your websites. Keep exploring new ideas and challenges as you continue your coding journey. Stay tuned for more exciting projects and tutorials as we progress through the #100DaysOfCode Challenge!